• Skip to primary navigation
  • Skip to main content

Wisegrip

Comfort. For Trombone Players

  • About
  • FAQ
  • Reviews
  • Store
  • Contact

I first became interested in trombone ergonomics when I started playing bass trombone full time in the Omaha Symphony. All I had when I won the job was a Bach 50, single trigger. I got along pretty well with that trombone, and borrowed a double-trigger horn if I needed one for pops concerts.

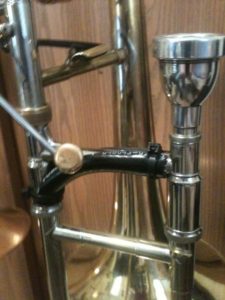
I knew I needed a double trigger horn, and I sent the Bach 50 to Steve Shires when he worked at Osmun Brass where he did a double trigger conversion. The reason I’m telling this story is because I also had him move the bell brace forward so I could hold the trombone like you do a straight tenor, with your thumb around the brace. Very few bass trombones and f-attachment tenors are made this way – why not? It’s a lot easier to just kind of hang the trombone by the crook of your thumb than it is to put extra pressure on the 3rd and 4th fingers to compensate for the weight of the instrument.

Evidently a lot of trombone players think the way I do, look how many of you have a Bullet Brace! I’ve got one, or something like it, on all of my big horns – except my Bach 50 with the brace moved to the right place.

That’s how I got started thinking about trombone ergonomics. Let’s face it, a trombone is an awkward instrument to hold and play. The left hand has to stabilize the instrument so the right hand and arm can move freely. But too much pressure or tension in the left hand and arm is detrimental. That tension has a tendency to effect other parts of the body, and before you know it, you’ve got tension everywhere.


With large-bore f-attachment trombones and bass trombones,  the manufacturers made it really difficult.  First, they moved the bell brace where it can’t be used as a fulcrum. Second they made the left-hand grip a right-angle.   Moving the bell brace or spending $100 on a Bullet Brace solves part of the problem, leaving the issue of the right-angle left hand grip.


In the 1920’s Earl Williams solved the right-angle problem with what he called the “Hand Adapted Trombone Brace”. (Here are some cool drawings from Williams’ 1930 patent application.  Our grip, as a removable version of the brace, is in the patent application process).


One day I was admiring a Williams 10 bass trombone that was for sale online.  A beautiful instrument, and like all Williams trombones, it had the curved left hand grip.  It looked so natural and comfortable, so I started looking around for something to approximate that grip.   I settled on automotive fuel tubing – really!  I just took about 4” of  the tubing, split it on one side and attached it to the trombone with zip ties – voila!

Original design with automotive fuel line tubing

I started making them for my friends and students, a lot of them still have a fuel tubing “Wise Grip 1.0” (we’re on version 11 at this point).   The next step was how to make something that was a little classier and easier to install than the fuel tube.  One of my orchestra colleagues’ son was just beginning an engineering degree, and he has a great mind for problem solving. Walter was sure he’d be able to create and adapt the cad designs for the grip. Walter is now a doctoral student at an Ivy League college, but he’s still interested in working on the grip – when he’s not working on surgical robotics!

Walter Bircher taking initial measurements of the 3d printed prototype
Comparing differences in different brands and models of trombone slides to put together a concise fit.
First prototype models created (need tougher material!)


This was when the hard part began. It started with a local fabricator who recommended machining it out of a plastic called UHMW “Ultra High Molecular Weight Polyurethane”, which is basically milk jugs. I had a fabricating company make a UHMW prototype from Walter’s CAD design. It fits, it works and man was it expensive! I really wanted to do some modifications, especially to the contour. You can see in the photo that the contour is a little boxy, but I would have gone broke doing multiple versions by the CNC machining process!

Walter said “how about 3d printing”. Yea right. This was 2012, home 3d printing was the brand-new domain of engineering nerds — like Walter! I let him finish “and I’ve got one ordered.” Of course he did. A roll of the plastic “coil” that’s used to supply the printer is inexpensive and can make dozens of prototypes.

Several versions and revisions lined up to compare.

So at that point we had a way to make revisions and try out ideas quickly and affordably. This was a godsend, and we got to work right away. The next 7 or 8 prototypes worked well and showed us where the flaws were. We went into another round of measuring and I got all the trombone slides I could find and made a spread sheet of the barrel and brace measurements. The goal was always to create a design that would fit as many instruments as possible. Symphony tenors and basses seemed a logical place to start, and where one could argue the need is the greatest – these are the big heavy horns that are the most challenging to play and hold for long periods, and a lot of people own them, from advanced students to professionals.

The only problem was the material. Home 3d printers are limited as far as the plastic that works with them. For the snap-fit application we were looking for, it was too brittle, and the first ones broke right away. As we tried different designs and printing processes, they got better but still broke eventually, as you can see in the photos.

So it was looking like injection molding was the process we were going to use.  The manufacturer makes a metal mold from your CAD design – very expensive, so you have to be 100% correct or you’re paying for another mold.  We had a good design, but I had a really hard time pulling the trigger on the mold, and it’s a good thing I hesitated.

Grips using the new commercial 3d printing process. Ready for prime time!

This fall I started hearing about a new commercial 3d printing process.  I found a manufacturer, tried a few prototypes and ordered enough to send to beta testers around the country.  Based on the trials and the input of a lot of trombone friends, it looks like we’ve found a good combination of fit, finish and design that’s ready for prime time.

The process is by no means finished, we’re already looking at a modification that will be released soon.  Then there’s the matter of medium and small bore trombones, not to mention contra-bass trombones.   I’ll be taking a lot of measurements this summer and see what we might be able to design for those instruments – the fun is just beginning, stay tuned and thank you!

Jay Wise,

Omaha, Nebraska

Copyright © 2025 · Pencil Box on Genesis Framework · WordPress · Log in